FIBERGLASS LIFE FORM TUTORIAL
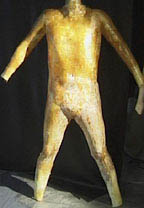
Sculpting A Full Suit Can Be Much More Accurate When You Have One Of These As Opposed To A Mannequin.
There are better ways to build a fiberglass life cast than what I am going to describe here. This way is the fastest and cheapest. It is down and dirty simple. For many this will be all you need to do. Be careful and remember, just because I did this does not mean it is safe or even smart but it worked. Try at your own risk. Keep the plaster thin so it will not heat up too much..
You will need:
Burlap
Ultracal 30
Water
Scissors
Five Gallon Bucket
Plastic Wrap
Some Thick Padding
Fiberglass Supplies
PVA Vinyl
Mold Wax
Lay down on a couple yards of burlap and have your partner trace your figure with a Sharpie marker. Make the tracing several inches larger in all directions than your actual body because you want it to drape over you. Cut this out with a pair of scissors. Trace it and make one more or them. Lay down on your back on a sheet of plastic on the floor after mixing several gallons of Plaster. Put a sheet of plastic over you and wrap it around yourself tightly. Have your assistant dip one of the burlap pieces in the plaster and get it nice and drenched. Have your partner drape it on over you. Don't worry about mess. Have your partner tuck it in firmly around you. Let it hang so it covers about half of your body. As the plaster gets thick add the rest and build it up a bit. When the plaster cools carefully remove it. It will get hot while curing so have a fan ready and stand by to evacuate if you can not stand it. Make sure your friend is there at all times. It should be bearable but all conditions are different. It will feel like a hot tub if you do it right. Try not to move or breath too hard. It will be very uncomfortable but only for about a half hour. Remove it carefully when it cools. Do not worry about minor cracks when you remove it. Lay some good fluffy padding on the floor and lay your plaster shell on the padding. Lay in your shell and repeat the process merging the back with the front. Making sure to have it fit together fairly well. Perfect is not an issue here. Add more plaster and burlap to thicken the outside of the shells until you feel confident you can move them around with out too much cracking. You will only use these once so cracks are not important as long as it holds its shape.
This much should take about three hours or even less.
Fill the cracks and imperfections inside the shells with more plaster and a spreader tool. Allow to cure. Shellac the inside several times with a brush. Wax it thickly with mold wax several times and buff. Spray it with PVA Vinyl and let dry. Repeat the waxing process. Repeat the vinyl process. Roll your fiberglass inside of both shells. Double layer it. Remove when finished. No matter how good you prepared your surface it will still be a pain to remove. Use a screw driver or two.
Fiberglass both halves together making sure to check your dimensions and circumferences against your own body. Add several layers of fiber glass on the outside if needed for extra strength. Sand and gel coat your whole form until you are happy. If you are just sulpting it doesnnot eve n have to be very smooth. You are just going to cover it with clay anyway. There you have it. Attach to a base and start sculpting.
You may find that you appear slightly flatter since you were laying when the mold was made. This is an amateur way to do this and that is one of the side effects. For many purposes it will not matter that much. Try to adjust for this when piecing the two half's together.
Good luck
|
|