TUTORIALS
My Armor Mounting Tutorial.
(Note: I used to do it this way but do not any more. There are better ways but this is simple and do-able with regular materials and little skill.)
Disclaimer: I make no guarantees or warranties that any of this will work for you. There is craftsmanship and knowledge of materials and trial and error involved here so beware. These ideas are just designed to help and if you get something from it than it was worth my time. If you fail I am sorry but thems the breaks.
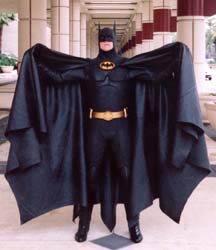
Ok, so you want to look just like Batman. You have some latex pieces and you want to put them together in an awesome suit that will make people go "Wow, that's the real deal!" instead of saying "That guys a dork. Batman doesn't have floppy ears like that and look, his armor is falling off" or worse, "held on by velcro." Here's what you do:
The best thing is to have it sewn on but we will assume you do not have access to a seamstress or the cash so I will tell you step by step what I do that has proven to work successfully for me. I will also tell you what I have done that you can do if you don't want to get as complex as I do.
Step One: Obtain good supplies and application pieces. If it looks pathetic when it is not applied to the suit it will look twice as pathetic when you actually attempt to go out in public and impersonate Batman. It doesn't get better when it is all together. It gets worse so don't bother starting unless you have good building blocks to work with.
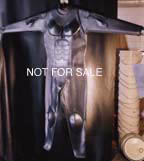
Step Two. Trim your pieces and finish them so they look brilliant even before you place them on the suit. Sand and fill and sand and paint till things meet with your personal level of satisfaction. Follow my tutorial on finishing unfinished latex items for this part. It is a good idea to reinforce your high stress points like knees or leg and hip areas with non tearing fabric from behind. You will be glad you did this later as things will hold up if you start kicking, punching, jumping, and doing somersaults and other such Batman type things. This can be done with latex as a glue. There are other ways but I don't know them nor recommend them
Step Three. Choose the right suit. Do not look for a rubber suit. Rubber tears and does not stick well to the application pieces because it is fragile and nonporous. If you want the rubber look you will have to do what I do which I will explain at the end. Choose a good dive suit that fits tight with no wrinkles. It will be a pain to get in and out of but all that matters is looking good while you are wearing it. This suit should be able to be placed on the ground or your work table on the flat because that is how you will later mount as I will explain. The flexibility of this suit should be about the same as your application pieces so that everything will stretch uniformly.
Step Four: Put your suit on and mark wear the pieces go with a black marker so you can barely see it. Have someone else who cares and you trust do this. Make sure you are wearing your suit exactly as you will when finished and stand up straight. Try all the different movements and anticipate problems.

Step Five: Place the suit on the ground or work bench and lay it flat. This is the most important part. I used to do it while on a mannequin or on me but it doesn't work because it distorts when you take it off. If it looks good while off it will look good while on. If you mount it on the flat it will flex with the suit and buckling as well as wrinkles will be minimal. It will be like a second skin. It works. That is how I did mine and it works.

Step Six: Tailor the piece to lay on the flat and away from as many seams and around corners as possible on the suit. I recommend cutting off the arms and mounting them separately for better movement. I know you probably are afraid to cut into the beautiful application piece you have there and do what I am saying but believe me it is worth it if you do it right because you avoid problem areas and all that matters is how your suit looks and functions while you are wearing it. It is not about preserving the integrity of the original armor piece. They are just the tools. They are building blocks if you will. If you need to alter them to make the suit work better for you than do it. But think it through and be careful before you go hacking. Measure twice cut once.
Step Seven: Line up the pieces with the marks you made. Remember the most critical area is the neck and where the suit meets the cowl's symbol. Second most important is the location are the bottoms of the breasts and the third most important is the knee area
Step Eight: Take Zap A Gap Green Label with Kicker and use it like a needle and thread. It is almost as strong. Push it down into the fibers of the suit and push well against the latex little by little so that when you zap it with the kicker it bites in to both. If you perfect this technique you will not need thread. Yes it will crack but it is under the rubber and you can not see it. Make sure it is just a thin line. Go little by little and all the time anticipate how to will all go together so that there is not an excess in the middle (if you started at the two ends and worked to the middle for instance.) Start with the neck with a dot on the shoulders then a dot on the ribs then the knee area. Just a dot. If you absolutely have to tear it and redo it you usually can if it is just a dot. Any time you are in doubt put tit back on and see how you are doing. The rest of the line of glue can be made later once you are committed and know you are on track.
Step Nine: Finish it off. I leave the arm areas unglued if at all possible and put velcro on the shoulder straps that go around over your back under the cape. This way you can attach the cowl with a specially designed metal mounting apparatus and bolt through the suit into a metal plate and attach the cowl and symbol securely with attached cape before putting on your cowl. Then you flip the cape over your head. You are in there snug and tight. You will not fall apart on your Batman missions.
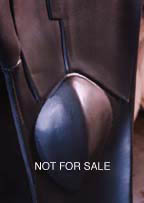
Step Ten: Knee caps. They need to be permanently glued to a sheet of rubber and sewn on. The details of this I am still working out at this time.
Step Eleven: If your boots go over your knee caps make sure they are lined with felt on the top or they will mess them up by constantly rubbing as you walk.
Step Twelve: Applying a piece of velcro where the belt goes and to the back of the belt at least in front so it always stays perfectly centered and in place is a good idea. Also, sanding the back edged of your belt till smooth will save it from gouging into the suit as you bend over and move around in time.
Step Thirteen: If you want to get in and out of your suit quicker cut off the lower legs that go in the boots and the lower arms that go in the gloves. Since these are narrow areas in the suit the whole thing will slide on quicker if you do this. Make sure you have enough over lap for the boots and gloves or you will be ruined and have to start over.
Step Fourteen: Avoid Armorall of you can because if you need to make repairs later down the line it will be easier to get the paint to stick if it is clean and grease free.
Step Fifteen: I don't do any of this any more even though it works. I use latex for glue and then spray latex over the whole thing for a seamless rubber look. This is a pain and I do not recommend it but for you hardcore realists I know you will not be happy until you try it. I will give this word of warning anyone that is capable of going down this road could have made the whole thing themselves.
Good luck and work carefully and safely. Ask questions. Remember, you are not Batman.
